Get lesson 1 of all sports: Sign up for a free pe planning membership
Volleyball
Free Sample
Year 4
Learning Objectives
- Intercept and stop the ball consistently.
- Send a ball into space at different speeds and heights to make it difficult for opponent.
- Describe how their bodies feel when exercising.
Curriculum information
Literacy Keywords
- Get in line
- Be ready
- Explore
- Experiment
- Skills
Citizenship
- Develop own ideas and experiences
Equipment
- Keep score of the game
Risk Assessment
- Suitable clothing and footwear worn by participants.
- Equipment suitable for participants, safe and checked.
- Area safe and checked - any hazards removed.
- Safety information highlighted to participants.
- Staff aware of all emergency procedures, including designated 1st aider.
Knowledge Checks
Throughout this plan you will see ‘Knowledge Checks’ to help you ensure the pupils are acquiring the intended knowledge as the lesson progresses. The two types of knowledge to focus on in PE are:
- Declarative Knowledge: Factual knowledge concerning movement, rules, tactics, strategies, health and participation (best practiced through spoken or written observations of a practical demonstration).
- Procedural Knowledge: Knowing how to apply declarative facts (best practiced through demonstration or participation).
Teacher Notes
- This is the first lesson in the Volleyball unit of work.
- The intention of the lesson is to introduce the children to the new topic. It gives them the opportunity to experience the game and explore the skills they will be learning and developing in the unit.
- The main activity within the lesson incorporates many of the skills and tactics that will be covered in the unit. Playing the game in this lesson gives you the opportunity to make an initial assessment of your class. By observing the children you can make a judgement on their current ability and plan your teaching for the rest of the unit accordingly.
Activities & Games
On Your Toes
3 - 5 mins- Spilt class into groups of 8 to 10 and form a circle.
- Each group needs a volleyball.
- The ball is to be passed around the group – Children can pass the ball to anyone but must call out the person’s name.
- Keep the ball moving quickly around the group.
- Children have to keep jogging on the spot all the time.
- If the ball is dropped everyone in the group must perform a forfeit e.g. 10 star jumps, before continuing to pass the ball.

Teaching Points
- Encourage children to keep moving – jogging on the spot.
- Good accurate pass
- Eyes on the ball, hands ready to catch
- Communication – must call out persons name they are passing to.
To make activity harder:
- Make the circle wider.
To make activity easier:
- Make the circle smaller.
Get Ready
5 - 10 mins- The children work in pairs in a space with a ball.
- Challenge the children to have a go at the following activities, they require them to get into position to stop (receive) the ball:
- Children stand facing each other, 5-6 steps apart; They roll the ball back and forth to each other, stopping it and rolling it with the hands.
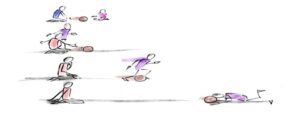
- Children stand next to each other; One child rolls the ball out for their partner (gently); Partner must run out past the ball, turn to face it and stop it with the hands.
- Children stand next to each other: One child rolls the ball out for their partner (gently); Partner must run out, past the ball, turn to face it, lie down and stop the ball with their head.
- The children should take it in turns to roll the ball to/for each other.

Teaching Points
- SAFETY POINT: Ensure the children are suitably spaced so the balls can be rolled safely
- SAFETY POINT: Use a suitable soft ball
- Eyes on the ball, watch it carefully. Where is it going? Get into position to stop it
- Get in-line with the ball
- Remind the children of the importance of the ‘Ready Position’ – will help them stop the ball successfully.
To make activity harder:
- Roll the ball a little faster.
To make activity easier:
- Instead of starting next to each other, children stay opposite each other as described in challenge 1.
Knowledge Check
- PROCEDURAL KNOWLEDGE: Ask some children to demonstrate the activity/skill.
- DECLARATIVE KNOWLEDGE: Ask other children to describe what is required to perform the task with success.
Key Skills Game
25 - 30 mins- Allow the children to play the game, explore and experience the skills needed to play successfully. Encourage them to experiment to develop ways to play the game successfully.
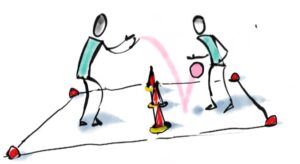
- The game is played 1 v 1 on a small court.
- The aim of the game is to score points by throwing a ball into the opponent’s court area and making it bounce twice.
- Courts for each pair should be set up as shown in the diagram – make the courts relatively long and narrow.
- The game is played using throwing and catching skills – A child throws the ball over the net/divide with the aim of making it bounce twice in their opponent’s side of the court. The child receiving the ball aims to catch it before it bounces twice before throwing it back over the net/divide.
- Every time a child manages to make the ball bounce twice in their opponent’s area they receive 1 point.
- Introduce a hitting element into the game (Children should play ‘Dig’ shots, see teaching points). Also add a second child on each side of the court. They act as a feeder – they throw the ball with a small underarm throw so that it bounces once to their partner who hits the ball over the net/divide.
- The feeder on the other side of the net/divide should try to catch the ball before it bounces twice and then feed the ball to their partner.
- Again, if the ball bounces twice 1 point is scored.
- More able children can play the game without a partner feeding them the ball and aim to play a continuous rally with their opponent. It may be appropriate to allow the ball to bounce more than once for these children.
- This game is easiest with a big ball that bounces well. It can also be played by pushing or sliding the ball across a line that is being defended (this is easier for some children who have difficulties with coordination).

Teaching Points
- Introduction / Reintroduction to volleyball
- What skills do you need to use? Ask the children to think about this as they play the game
- Experiment with different ideas and skills
- How can you score points? Ask the children to think about this as they play the game
- Observe children whilst playing the game – are they able to play it successfully?
- What areas do you need to focus your teaching on in the rest of the unit?
- Provide advice and guidance if necessary
- Explain the rules and how the game works then let the children explore the game for themselves
- Let the children have a go at the game
- The technique for the ‘Dig’ shot: (see diagrams 1, 2 and 3)
- Cup the hands together as shown in diagram 1
- The thumbs and forearms should be held together as shown in diagram 2
- Stand in the ‘Ready Position’ as shown in diagram 3
- Move to get ‘in line’ with the ball as it comes to you
- Keep the arms straight – make contact with the ball with the forearms, just above the wrists
- Direct the ball by pointing the arms towards the target as contact is made
- Push the ball towards the target by pushing the arms forward and up; and straightening the legs
- SAFETY POINT: Do not interlock the fingers
Adaptations and variations:
- Play the game on a different-sized court, or with a higher or lower net (to make the games easier or harder).
Knowledge Check
- PROCEDURAL KNOWLEDGE: Ask some children to demonstrate the activity/skill.
- DECLARATIVE KNOWLEDGE: Ask other children to describe what is required to perform the task with success.
Static Stretching - Teacher Lead
3 - 5 mins- Ask the children to stand in a semi-circle around the teacher.
- Show the children a stretch they have to copy.
- Start at the top of the body and work all the way down the body stretching the major body parts – arm and legs.

Teaching Points
- Hold for 10-12 seconds
- Hold still, don’t bounce
- Watch and copy
- Where can you feel the stretch?
Knowledge Check
What is a net-wall game?
- A game where a player sends an object (hits a ball) towards their opponent’s area (half of the court). The aim is to make the object (ball) land in the opponent’s area and make it difficult for them to return it. In net-wall games such as volleyball the court is divided by a net which the ball must be hit over
- Other Examples of net-wall games are – tennis; badminton; table tennis; squash
What skills were required to play the game successfully today?
- Encourage the children to think about the skills they used when playing the games
- What skills do you think you need to work on to improve your performance at the game?
Get lesson 1 of all sports: Sign up for a free pe planning membership